Langstead – Episode 6: Playing God

Yes, yes, I know it’s been a while. But I promise I have been busy working away. Both with real life things and actual important things like Model Railwaying!
In the beginning there was ballast-coloured-scenic-mat and it was good.
But now it’s time to start thinking about improving on ‘good’ and developing the scenery. Or in other words to start adding the Green. 
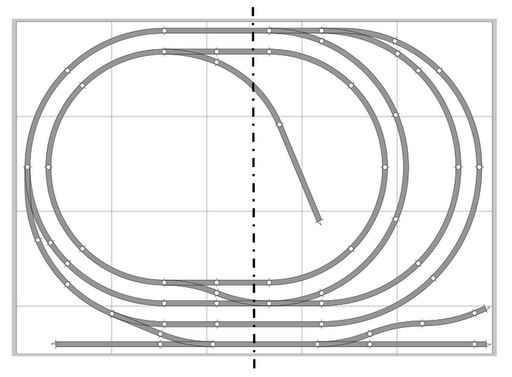
If you head back to ‘Planning Permission’ (Episode 3) you can refresh yourself on the scenic materials we have on offer to us and how I originally arrived at the decision to first lay a ballast coloured matt and then secondly add some grass/field based green scatted. It’s now time for that second step.
Scenic scatter comes in a huge variety of colours, textures, sizes and coarsenesses. If you’re feeling particularly dramatic you’ll find colours such as red/orange/brown for quarry, industrial and maybe even autumnal effects. You’ll also find a variety of rocks, gravel and mineral effects in the Scenic Scatter Isle of your model shop/ebay. But we’re going to start simple with some green for a field/grass effect. Again there’ll be a large choice on which ‘Green’ you choose. I went for a light-green bag and a dark-green bag which I shall mix together. I’m hoping this will create a more natural look, rather just using one shade of green.
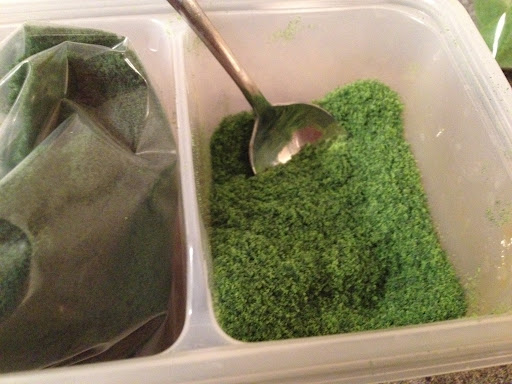
Scenic scatter is rather hard to describe. It looks like powder paint, but feels a little more ‘fuzzy’ than that. On returning home I mixed the two colours 50/50 in a container. That isn’t the best picture in the world above, but if you look carefully – just in the top right of the picture – you’ll see the bag of light green scatter which has been mixed together with the dark green on the left. 

  
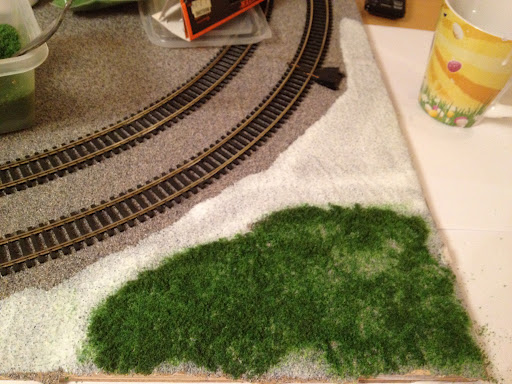
I started with a rather in-offensive test patch area to the corner of one of the boards. As before I mixed PVA glue with a bit of water (I’m not quite sure of the ratio I used here probably about 70/30, you want the glue to spread easily but not to be runny like water) and painted this on liberally to the board. Remember PVA glue dries clear so it doesn’t matter if you get it on an area you didn’t mean to, but do try to avoid the track. Obviously. 
Next sprinkle on your scatter. I don’t think there’s a right or wrong way to go about this but I used a spoon. This way you can dump large amounts of scatter; as well as being able to tap the spoon with your finger to scatter more finely on the edges of the glue. 
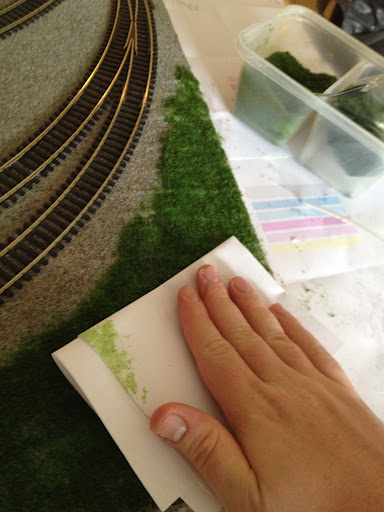
Eventually we will add a second coat of glue on top of the scatter we have just laid – however I found it useful to pat down the scatter using either my hand, the back of the spoon, or even more effective – a folded up piece of paper. Don’t be too forceful or you’ll end up getting the scatter stuck to the paper, just lightly press down and this helps the scatter to stick to the board as well as helping it to spread evenly. 
I let the test section dry over night and once I was happy that nothing had gone terribly wrong I went ahead and continued to add green elsewhere on the layout. It might be worth having a small piece of wood with a section of track nailed down to for these testing purposes. However I don’t have such piece of small wood so this is why I just used a small section of the layout for my scenic test.
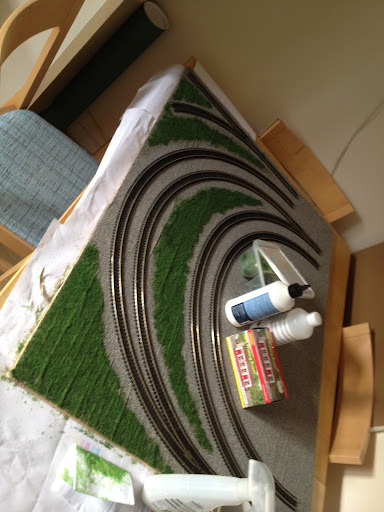
After repeating the process on a larger scale this is what one of the boards looked like. You’ll notice the creases in the scenic mat are more obvious here. I think this had something to do with the glue still being quite wet, this eventually evened itself out after the second layer of glue and more paper-patting.
I purchased a bottle of proper ‘Scenic Cement’ from my local model shop. I’m pretty sure it’s very similar to PVA in its qualities but I used this partly out of curiosity and partly as I know it a recommended product amongst model railwayers. Once the first layer dried I applied a layer of this. Again be generous with your glue helping but try to be controlled on the edges of the scatter. We’ll come onto a problem that this caused soon…  
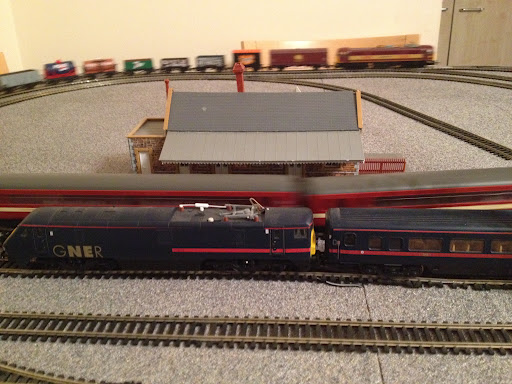
So here’s a picture of the end game after the 2nd layer has dried and I’m rather pleased with the result! The dual colour has really worked a treat and the 2nd layer of glue gives the scatter a nice finish.
The little coal dump by the way is from the Hornby Skaledale range – I will get onto buildings and ornaments on a later episode. 
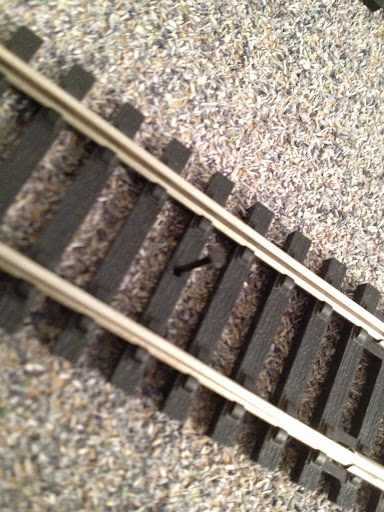
There was however a slight problem. You’ll notice top left of the picture there’s an unsightly patch of green that’s not following the line of the track? This isn’t a rogue patch of scatter – this is where the glue has run. When you paint on the 2nd layer of glue it is almost unavoidable that your brushes contact with the scatter doesn’t eventually dye the rest of the glue a pale green colour. This rather unfortunately is the result of that green died glue running!
You can see it more evidently on this picture occurring in multiple locations! This does look really sloppy but thankfully I’ve come up with an idea to solve it. You remember I said scatter comes in various different forms and colours? Well thankfully they also make a scatter version of the grey ballast. I’m hoping that adding some of this to the offending areas and – here’s the clever part – dropping on some glue using a pipette so that I’m not risking the glue being discoloured by the scatter will solve the problem! 
This really does highlight the importance of being controlled with your 2nd layer of glue! I’d even recommend not gluing right to the edge and instead waiting for this to dry before pipett-ing the boundary between grey and green.
You’ll also note that there is still a large area in the middle of the board that’s still grey. As I add buildings so will I work out where more scatter needs be applied. We’ll talk about buildings another time.
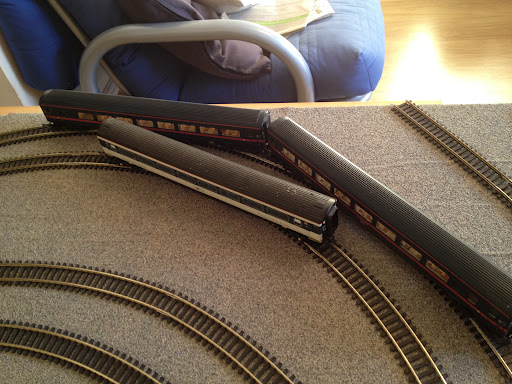
Until then here’s a few more close ups of trains and good looking green!

Langstead – Episode 5: Pins & The Grand Opening

So this is where we left off: 
A rather blank looking canvas of ballast, grey track mat glued to the baseboard. Next up we need to actually lay the track down.
For this you’ll need some ‘pins’ which are essentially a model railwaying term for ‘nails.’ Again you’ll get these from any decent model shop and of course eBay. I got mine on the same trip excursion to John Dutfield in Chelmsford as the roles of track mat. You shouldn’t have to spend a fortune on these… I’d avoid the Hornby branded ones as you only got about 10 in a packet. eBay will definitely be able to furnish you with a bag of 50 or so for half the price. There’s very little difference in track pins, as long as you get ones for 00-track they should fit no problem.
Some model shops will also stock a sort of ‘pin applicator’ to PUSH said pins into your baseboard. On research however these only look like they’ll really work if you’ve got a softer baseboard, one made of cork or jelly for example and I can’t really see them working very well on our plywood. Therefore we’ll opt for the good old fashioned WHACK approach. (Off to homebase for a hammer we go – don’t forget it needs to be narrower than the width of your track gauge. In the case of 00 track this is 16mm). 

Next up I laid out the track in full plan once more. Partly to see how good it currently looks but mostly because I’d recommend doing this rather than taking an as-you-nail approach for the reasons I’m about to explain. 

Laying out your full plan first will enable you to make absolutely sure there are no kinks in the track (by this I mean where two pieces join) and to make sure double/triple tracking is correctly spaced. If you head back to http://www.freetrackplans.com/Geometry.php you’ll be able to double check some of the official track spacing measurements. If you’ve chosen to have crossovers and loops that diverge from a single oval these track spacing’s SHOULD take care of themselves. Referencing my layout you’ll notice there’s a crossover between the inner and 2nd ovals and that the 2nd oval spur the outer loops. I’ve followed the advice on Free Track Plans Dot Com Forward Slash Geometry such that these all have uniform spacing between ovals. You can of course choose to ignore these geometries, which I’ll mention are officially supplied by Hornby, and opt for your own but you’ll need be absolutely sure the space between lines accommodates your stock without accident!
To double check it’s worth loading your ovals up with some stock to make sure their loading gauges don’t overlap. The loading gauge is the space required either side of the rails to accommodate your rolling stock. On curved track your stock will have a natural ‘overhang’ from the bogies. If the loading gauge does overlap it means two trains may touch each other as they go round curved sections of track. Here I’ve chosen some of my longest ex-BR Mrk iii and iv coaches (which logically being long have large loading gauges!) and they fit perfectly. (I’ll also mention they work perfectly on the inner two ovals too..).
So no more dawdling! Time to nail it down. Keep making sure your track hasn’t shifted, maintaining your track spacing as you whack away. I actually found that because of the rough surface created by the track mats the non-nailed down track didn’t shift about as much as I expected. The ply wood really did take the nails with ease and the job was done in a good 20 minutes!
Here’s a picture of my board sitting in storage with track nailed down. Remember the gaps (top right) enable sections of the non-nailed track to be removed for storing.
You’ll remember from the last episode that I talked about the track mat being a bit ‘flaky’ and some of the ballast effect … erm ballast… was coming off and making a mess. My flat mate, Mike Cramer (full credits there matey), suggested: ‘Isn’t there some sort of spray on glue you could use?’ Why yes Mike that’s a genius idea! Now you could go and buy some ‘glue spray’ from your local hardware sure – such an item does exist. However I just made up a solution of left over PVA glue and water (this time it was more a 50:50 ratio) and used an old detol style kitchen spray cannon to apply the glue. Be quite liberal with it and apply as much as possible. At this stage I do wish I’d thought of it BEFORE nailing the track down, and I hope you’re not following this blog in a similar step by step process as you’ll also be regretting not doing the same! This was mainly because I had to be careful not to get any spray on the track. I therefore had to ‘miss out’ areas of the track mat which is still causing some shards of ballast to come unstuck. I will say however that this has helped massively the problem. You’ll notice from the picture above that some areas look ‘discoloured’ – this isn’t the shadows in my boiler room this was caused by the glue. Now, I rather like this, as in real life ballast and rock is not a perfect uniform colour so it has given my layout a more natural effect. If you’re not so keen on that idea then I’d recommend going for a track mat that was more felt based than mine thus avoiding the need to spray-glue the flakey bits. 
Next, well I had some fun with it next!

Langstead – Episode 4: Engineering Works

In the last episode I elected to go with the ‘Track Mat’ as a base material for my layout. As mentioned previously these come in a variety of different colours, dimensions and textures. I suggest shopping around, yes – eBay does offer good prices but you can never be 100% sure of what the Mat will look like as the pictures online are often not brilliant. If you’ve got the time and patience get down to a model shop so you can do a bit of window shopping and then you’ll probably be able to shave a few quid off your Track Mat by buying online, but I have found prices in shops to be pretty competitive and reasonable anyway.
If you are thinking of finding your local model shop – pick a good one. In past (young Andy) experience, Model Shops can be very hit and miss. Sometimes they’ll cater for a wide variety of modelling such as warcraft and erm other things like that… (Modelzone in Holborn, London is pretty good for this) but some will more resemble toy-shops who stock a few train sets on the side. If you’re lucky though, you will stumble upon one that pretty much specialises in just trains (yay!). These definitely tend to be the best in terms of quantity and quality of stock. My shop of choice is John Dutfield in Chelmsford, Essex however off the top of my head there’s a really good one in Betwys-y-Coed, North Wales…..
This is what I went with… Gaugemaster Ballest affect TrackMat measuring in at 1m x .75m. This does means I’ll have to buy two roles per board in order to cover it, however you may struggle as I did to find (both in shop and online) a Mat bigger enough to cover a 2.5 x 3ft space!
Next comes the messy part – glueing the paper to the wood.
PVA Glue will do the job very well, but I’d definitely recommend watering it down to create a sort of wallpaper-esque paste. The model railway online forums will suggest a variety of different Glue:Water ratios but I went with 70:30. This should make the glue easy to spread but thick enough to take some adhesion.
In true blue-peter fashion, lay down some newspaper – I made sure to pick one up on the tube that day so don’t judge my political or culture choice – and start laying on that glue. Many people will elect to glue the back of the Mat but I figured glueing the wood would actually be far easier and far less messy and it ended up worked just as well. Don’t be scared, you’ll want a decent coating all over. I used a jug to mix the clue which also came in handy in a sort of ‘pour and spread’ technique.
Find yourself a Leah/Girlfriend/Boyfriend/Colleague/Parent/Cat* to help you lay down the Mat. I found it easier to lay the Mat straight from the roll and then trim it once it had dried rather than a cut-to-size first. Make sure your Leah/Girlfriend/Boyfriend/Colleague/Parent/Cat* also comes with a good supply of heavy duty University literature. This will act as a very good weight to let the glue set especially at the edges. You’ll notice that the Mat looks a little ‘bobbely’ and uneven… To sort this out I used the Oxford Dictionary pictured above to ‘iron out’ these creases. Push down on the book pretty firmly and move it slowly across the board – it’ll work a treat. To cover the final 3rd (pictured above left) I hacked one of the rolls in half with a knife (above right – be careful now kids), again to make it easier to lay.
*A cat will definitely not be of any use to you.
I repeated with the 2nd board and then left the glue to dry for 24 hours. Where possible keep as much weight on the Mat as possible to help it stick. You could use lots of books, but I turned the 2nd board upside down and placed it on the first. I then put the coffee table in our living-room on top of this Board-Ballast sandwich to help weigh it down and I must say am very pleased with the results….
And there we have it. You’ll notice the ‘bobbles’ have been smoothed out by the combination of Dictionary-Iron and allowing the Mats to dry underneath a coffee table… There are a few blemishes, but hey this was my first ever go at this what do you expect?! The join line on each board is noticeable yes – however don’t forget we will be adding grass/roads/other scenery at a later date so these will eventually be covered up.
The only thing I will say is the Gaugemaster Track Mat’s actual Ballast effect – which essentially is made up of very small wood shavings stuck onto paper, was that it’s pretty loosely stuck down. By this I mean you will create a massive mess as these little flakes of grey unattach and sprinkle themselves all over your living room when moving the boards about. This was very annoying, however I found, or rather my flat mate found, a rather ingenious way of solving (or at least greatly improving) this problem.
Join me in the next episode to find out what it is as we also lay down the track!

Langstead – Episode 3: Planning Permission

Planning Permission
 
Google has been working hard in the last few days to provide an answer to the question: ‘What shall I lay on my board first?’  
 
If you’re a little bit confused by this question, let me explain…
 
Before any track can be nailed down, we’ll need to consider what is going underneath. There are probably going to be two main colours on your board depending on what ‘scene’ you are trying to depict: Grey – for track ballast. Green – for grass and scenery. However, you may also be considering Black – for tarmac/pavement/road, Blue for coast/sea/dockyards and maybe Browns and Oranges for industrial plants/quarries/mud etc.
 
As I’m not trying to complicate things too much, I’m just going to go with Grey for ballast, and Green for general scenery. I will intend at a future date to probably add a road or a street or two, but let’s worry first about Grey and Green.
 
Before I make my final decision on what material to use let’s consider some of the options open to us. Remember – we have to get this stage right as we’ll be committing to nailing down track after this, which is sort of a point of no return. Once we’ve done this it’s going to be exceptionally difficult for us to change the base material.  So choose wisely, and do which method you feel most confident with!
 
Paint: Literally go straight onto the wood with a coat of Dulux, or Cuprinol. Whatever floats your boat.
 
Pros: Very easy. The most basic option open to us is to paint the entire board green or grey. Then once the track is nailed down we can add ballast or grass over the top depending on what colour we went with first. Alternatively we could mark out the green and grey areas first and paint those two colours accordingly. It’s going to be quick to achieve and isn’t going to be as messy as any of the alternative glue based options (bellow). I’m not sure how much paint costs, it could be expensive but I imagine if you shop around and just get as much as you need it’ll actually be pretty cheap.
Cons: It’s probably going to look pretty basic, however if you think it looks crap before you lay the track you could in theory change to one of the options further down. (Just let the paint dry first!).
 
Track Mat: Kind of like fuzzy wallpaper, you buy this stuff in roles and glue it straight to the board. Comes in a variety of sizes, colours and indeed fuzzyness.
 
 
Pros: It’s cheap and very easy to add one base colour. Glue board and lay like wall paper. Done. It’s going to look much better than paint, and just like paint we could glue down one colour, and add others over the top at a later date. 
Cons: Two colours will be slightly harder to achieve. Firstly it’ll be more expensive, and you’ll probably end up with loads of off cuts from both colours. You’ll also have to cut the mat to the shape of the track and at some point we’re going to have to join the colours together which could look rubbish if we don’t do it absolutely accurately. Again if the boards you have are bigger than the roles you buy, you’ll need to have an unsightly join line. Finally this method involves glue, and glue is always messy.  
 
Scatter: Glue goes down first, and then you sprinkle on a topping. These come in a variety of different flavours ranging from authentic looking gravel for ballast to fluffy looking shrubbery for green scenics.
 
Pros: Get it right, and it’s going to look brilliant and the best of all the options! Laying two colours will be far easier to pull off as you’ll be able to hide the join lines with varying degrees of scatter. 
Cons: Expensive. Very expensive. I’d recommend getting on ebay to see if you can buy bulk rather than going to model shops. Time consuming and difficult especially the ballast part.
 
Conclusion: Naturally I’m going to sit on the fence and go for the middle-of-the-road option – The Track Mat. It’s going to look better than paint, but it’s not going to be as hard and expensive as scatter. To avoid unsightly join lines and make the process even easier, I’m going to lay only ONE colour. I’ll then add the other by using scatter. (OK so I sort of chose two options from above!).
 
 
So what is the most dominant colour? I’ve gone back to my layout plan file (above) and drawn on (using that most professional of tools – Microsoft Paint) what I think is going where.
 
White – track ballast. So in these areas we’ll need some form of Grey preferably that looks like, well, ballast. 
Green – grass/fields/assorted shrubbery. Basically stuff that isn’t ‘railway.’ This may include roads and buildings and in the future.
Yellow – basically the areas that could be either. These could quite easily be green or scenic, but on the flip side there might be line side buildings, depots, signals, stations and miscellaneous railway furniture than in real life would still be within the confines of the ‘track bed’ area (which in our case is the colour ‘Grey’).
 
My vision of this layout includes the addition of lots of line side furniture more so than a ‘country scene’ so let us assume all the yellow areas are Grey as well.
 
So coming up next time – we lay us some Grey Track Mat. Join me then!

Langstead – Episode 2: Design

Design:
 
After hours on the internet researching Model Railways I decided my layout needs to have certain criteria:
  1. Probably the most important of all: The Layout should be easily dismantlable/storable. I live in a smallish flat in London now and with other people so there really is no room for a permanent fixture.
  2. Despite this limitation the Layout should be as big as is logically possible to make the most out of all the existing track (Hornby) I have and so that I can run at least 2 trains with more in sidings. This presented two further limitations:
    a) The board(s) need to fit in my car. This is mainly to aid in moving it when I move house, but also just in case it’s good enough to take to an exhibition!


    b) It needs to fit somewhere in the flat, and it will be sitting on our extended dining table when out. Soit  can’t exceed certain sensible dimensions.
  3. It should be easy for me (a relative novice at DIY) to build. However, it should still look as good as possible whilst maintaining a modest budget. 
  4. It should be easy to set up and set down.
With these in mind it was back to the world wide web. 
 
If I’d have google’d ‘Model Railway Base Board’ when I was younger then maybe we wouldn’t be in this mess. Well it turns out there are plenty of companies out there that will professionally build you a base board, which could fold in half or split for your convenience and in some cases lay down scenic felt. 
 
This would certainly fulfil the ‘Look good’ rule, and all could be made to measure which fulfilled ‘Fit in car,’ ‘Fit in flat,’ and ‘Have lots of track.’ However these certainly were expensive and did take away a little of the ‘Make myself’ element to the project.
 
I therefore elected to go to B&Q and buy some wood myself. This would be cheap, and I also knew from previously purchasing some MDF to cover up my window to help me sleep during the day after working nights, the exact dimension that my car will accommodate. This lead to the parameter, 3.5ft by 2.5ft. This is big, but not big enough for a layout. I would therefore buy two of these, seperating the board in half when storing the layout which gives me 5ft by 3.5fto work with. Perfect. Now we just need to work out the layout itself!
 
A very useful website I found was http://www.freetrackplans.com. Name sort of does what it says on the tin. It gives ideas on Hornby track layouts on certain pre-given sizes. If you go to the geometry section of the website it also gives advice on curve diameters – which played a part in helping me confirm the size of my layout. If this wasn’t enough help FreeTrackPlans also links you over to a program called ‘AnyRail4.’ Which is a free* track planner tool you can download.
*Free up to 50 pieces in layout.
 
So I set to work , setting my project to be no more than 5ft by 3.5ft and this is what I came up with.
 
Layout
The dotted line denotes where the board splits in two. I plan at this point to nail down anything that doesn’t cross this dotted line and keep the middle straights lose for easy dismantling. This setup also allows for a great deal of future proofing. In theory another piece of wood can be added in the middle when/if more space becomes available to me.
 
The layout features two ovals (Hornby 1st Radius & 2nd Radius) so two trains can run simultaneously. It also features 2 outer loops meaning at least one (preferably two) other train can be held here and alternated with the running one. The right hand side of the inner oval can be isolated by points, meaning a train can be held here whilst the siding in the middle of the board is accessible from the outer oval. All these options add for lots of flexibility, lots of trains and without complicated powering scenarios.
The long term goal will be to have a town scene in the centre of the board with a modest village style station occupying the straight section of the track towards the bottom of the oval. The siding will act as a wagon yard for the station. The sidings at the bottom of the board will allow for further stock storage and possibly some depot style buildings. At this point I will mention that I do need a liiiitle bit more track (for the 3rd radius curve) which is slightly depressing as I have ALOT of other spare track left over. However, this layout looks like it will really work so I’m going to run with it. Off to B&Q Leah and I go. 
 
Ply Wood
I opt for 12mm ply wood. To make it seem like I made an educated man-decision this was because I felt MDF would probably put up a fight against a measly track pin. However it will still be durable and strong. Sundeala and Chipboard were also options however I’m told by google and model railway forums that these are prone to warping in heat fluctuations if not built on a frame. I’m not going to build a frame, mainly because this means more money on tools – but more it’s a case that I can’t be bothered. It’s useful to note that my flat has recently been fitted with a new boiler freeing up some storage space. and providing a location to store the boards at a constant temperature. 
 
Thankfully B&Q will helpfully cut your wood to size. Although the annoying bloke at Beckton Park will be confused as to why you don’t want the offcuts. Why do I need them?! 
 
On return to the flat I set up as much of the layout as possible (minus the missing extra track at this point) to gauge an idea of how it was going to look.
   
Track Rubber
Top Rail: Clean
Bottom Rail: Dirty
First of all though, the track needed a damn good clean. It had amounted 6 or so years of premium grade dust and was hindering the running of trains to a mere stutter (much like the central line if you lean on the doors). To clean them I used Hornby’s track cleaning rubber. Luckily I already had one, and despite me thinking it might have disintegrated over the years it still performed the job perfectly. (I’m also surprised that the changing temperature in the previously mentioned parents loft hadn’t damaged the track. The day I collected it was sweltering!). 

Track Laying
BR Sprinter
Track was laid and trains were run. The BR Sprinter smoked a little on start up. (Yet more dust) But once run it was fine. All the other trains now worked very well on the freshly cleaned track!
  
Leah jumps in and decides that Model Railways are definitely fun and sits there for a good 5-10 minutes making DLR announcements. Bless. 
 
At Cutty Sark – The first two sets
and last to sets of doors will not open…

You’ll notice at this point that I have very ‘modern’ trains, an exBR Sprinter, an East Coast Mainline 225 (in former GNER lively) and an EWS loco. Most modellers try and set a theme/locations or a period for their models. Whilst I have modern trains running here, I do have steam too. My cunning plan is to make the town scene as neutral as possible so I can run either if I want to have a theme.

 
So now we have a board. Lots of trains. And nearly enough track. The next stage is figuring out what material to use to cover the board and how to do it!